Wednesday, April 30, 2014

SGC all about me challenge

Hello Blog-land! Wow has it been a crazy month for Andiepants. Lost my mojo for a minute there and had to find it again. My room was soooooo tore up that my crafty GF came and helped me clean my house. Although she only shoved craft stuff into bags it really helped me to focus and cleared my table...all just in time to pack for a getaway where I stayed with my girl Kim...who is the newest member of the Swirlydoos DT!!!!

*Crowd goes wild*

Congrats Kim!!

and while at Kim's I got to do tons of scrapping. To say my mojo came back would be an understatement.

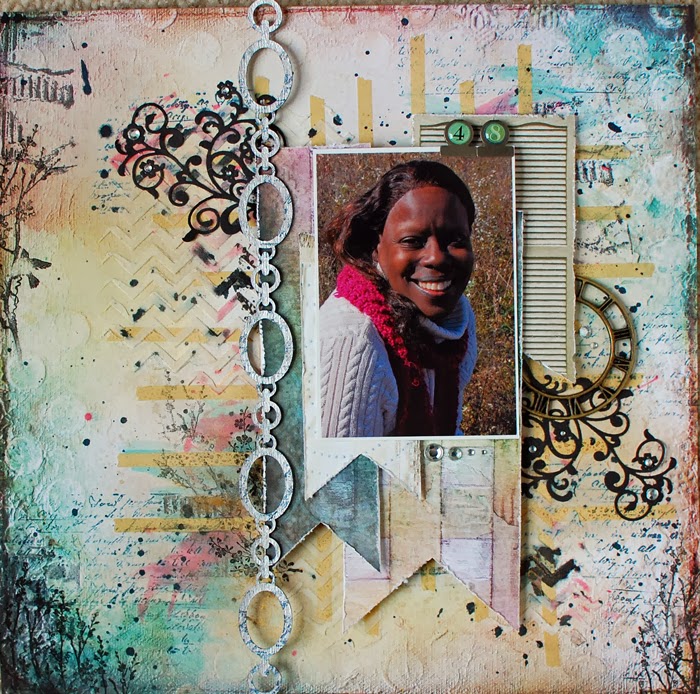
Today I'm briefly going to share with you a LO for the swirlygirls challenge...All about me.


For this LO I used Prima Princess papers, tag, wood embellies, and typewriter keys. While out of town scrapping with my girl I got a ZVA swirl to go with these papers...and it was perfect!! 

The photo is a pic of me that my GF took while I was on my scrappy visit last weekend.

  
I decided for the chandelier that I wanted some of the elements different so I used 2 different embossing powders. Both came in the January swirly kit. I used the Lindy's Hibiscus Rose Orange and Silver moon sapphire. The pink is soft and shabby...not a sharp pink. It blends so well with these papers (WHICH I AM TOTALLY IN LOVE WITH)

The corner piece is painted with gesso and the chicken wire is colored with Distress Markers. 

Thanks for stopping by and prepare yourself...there will be another post tomorrow!

*GASP*

I know right ;)

{{hugs}}

Andiepants

Thursday, March 6, 2014

eP blog hop and challenge


Welcome to eclectic Paperie’s ePlay Challenge – Push Your Boundaries!  We’re altering our challenges in 2014, creating one, month-long challenge, increasing the prize drawing, holding a design team blog hop, and including a product discount with each new challenge!  Check out the details below:


·         We’ve combined our two challenges into one, announced on the first Thursday of each month.  This gives the design team more flexibility with challenge topics and projects and allows you more time to enter! 

·         We’ll also feature a product each month, and during the first day of the challenge, you’ll receive a discount on the featured product….be sure to check for the special code! 
·         Our prize drawing is increasing from $15.00 to a $25.00 gift certificate and the winner of each challenge will be announced on the last Thursday of each month and will be featured on the eP blog. 
·         Each month we’ll hold a blog hop featuring the beautiful artwork from our design team…just scroll down to the bottom of the post for all of the links!  Talk about inspiration!!

Our challenges are about encouraging you to explore your creative journey and inspiring you to step outside of your comfort zone.  When you submit your artwork, share a unique card, scrapbook or journal page, a canvas, home décor project, or anything that you’re excited to share!  We’re looking forward to crafting with you!

Today’s special is on Liquidtex Gesso and for one day only, you can save 10% on a bottle of gesso…perfect for all of your altered projects!  Simply use code GESSO03 when checking out.

This month’s challenge is altering a book.

It was just my luck that I had purchased a book from the restore while pursuing with my crafty friend last winter. I had this little gem sitting up in a cupboard just waiting to be unleashed into something fantastic...and this challenge was it!

I was chatting with said same crafty friend regarding this challenge and it struck me...I would make a tablet cover!!!

The first question is...can this book cover a tablet. If you go online to check dimensions you will find that tablets come in EVERY size under the sun. IS NOTHING STANDARD ANYMORE PEOPLE?!

*composes herself*
Anyway...I found that my book was too small to cover any sort of apple tablet and too big for a kindle...but the Nook was JUST RIGHT :)

I started by removing the innards of the book. Just take a utility knife down the inner edge on the inside of both the back and front cover. The entire book should come right out of the cover. Mine was glued in a couple of spots so I did have to slice through the glue.


Then I covered the entire outside in gesso. This is to get a really good seal on the book so the spray will cover nicely as well as create a base. Gesso can be used as a paint but was originally intended as a base. Ever notice the canvases that you purchase are white? (or sometimes black) but when you purchase canvas material it's cream colored and raw? Well, those canvases that you purchase on a wood frame have been pre primed with gesso (oooooo...and the light bulb goes on)


Anyway...enough with the art lesson...moving on


I then flipped to the inside cover and measured and sketched what I needed and where I wanted everything. Here's a bit of a note...I created a spot to attach altered ribbon in order to tie the 2 halves together but decided instead to go with magnets as a closure. If you don't have magnets, use an awl to punch holes through the book cover and attach your ribbon as a closure. Super cute and you can make it coordinate too.


Once I punched my unnecessary holes (haha) I then began to adhere pieces to my cover in layers. I decided the front would be much more decorated. I added lots of washi tape, a doily, and some adorable embellie pieces from eP. Check these out:

Petaloo Color me crazy silk
Petaloo Color me crazy straight cut
Maya rd wooden ruler
Maya road flower centers


I know the title may seem a little cheesy but hear me out. So I called my girlfriend and found that she had a nook. I said "great...You are getting a handmade gift." She replied "I love gifts for no reason" to which I responded "it's not for no reason, it's because you're my friend". So, cheesy yes, but it has meaning.

 
From here I sprayed the entire piece with Dylusions sprays in Calypso Teal and Vibrant Turquoise. Yes...I realize I use turquoise a lot, but when I decided to make this for my girl I called and asked her what her favorite color was...guess what she said. *sigh*  If you look closely in the above picture you will see little pink flower gems. This is one of my most favorite techniques to do with Luminarte glazes. Because they are a glaze, they are see through which means you can color rhinestones any color you want! Isn't that great?! Since my color scheme was going to be varying shades of blue and teal with orange accents, I decided to color the rhinestones with Spiced Pumpkin silks glaze in order  to turn them orange. 

Here is my final cover:


I also used Tattered Angels glimmer mist in Patina and Aquamarine for the added shimmer to the misted portions. The glazes were applied in layers starting with Teal Zircon, Guatemalan Green, and finally Sky Blue. 

You can really see the iridescence of the silks.


After coloring with sprays and mists I added a large rub on to the back and binding that was in my stash.


I wasn't expecting the orange. It was a nice little surprise.

I used a Prima stencil for the back


I hope this inspires you to make something super awesome with your altered book. I had so much fun with creating this cover that I ran out of time to cover the inside with paper. LOL

Make sure you hop through the other DT blogs to see what fantastic creations they have come up with. 

And don't forget to hop over to the store to grab your discount on gesso (along with a few other mooooost have items of course) so that you can play along for the chance to win $25 in the store.

Hugs
Andiepants

Thursday, February 20, 2014

eP eTeam Picks Challenge and Valentine Winner

I don't always have the chance to play along with eP challenges but when I do....watch out! Andiepants in the house!

Altering a bag. hmmmmmm....I've done this before. Didn't turn out so well, so here was my chance for redemption.

First, I dug out this Master Cam bag that my hubby brought home from a machinist trade show about a decade ago. 


I decided I didn't want 2 handles so I started by using my seam ripper to remove the handles that were sewn on.


To color the handles I soaked them with water first. This allows the mist to spread more evenly over the fabric. Next I sprayed my Dylusions mist in Vibrant Turquoise generously over the handles so they were well covered. You may want to use gloves. I did not :(

In order to cover that gawd awful picture I decided I would cover the thing in gesso. Remember when working with fabric to place a piece of cardboard in between your layers to avoid bleeding and soak through. Here I just used an insert from a 12x12 Prima mask.


Cover generously with gesso. If you feel you need more coats make sure you dry thoroughly in between coats. Honestly I remove the handles and covered in gesso before dying the handles in order to give my bag some additional air-dry time.


Once covered to my liking I then used Distress paint in Broken China to color the background. after that was dry I sprayed some Vibrant Turqoise in order to allow some congruency to the piece. I did this to both sides of the bag.


You will want to do the handle next since you need to reattach it to the bag. Make sure your sewing needle is a large enough gauge to handle the material of the bag. I sewed my to pieces together to make one long handle, sewed a piece of trim down the middle, and then sewed each end to the seams in the bag.


You can see here where I attached it on the inside.

The rest is just like scrapbooking! For the front I adhered a piece of burlap using gloss gel medium in various areas. I adhered the large lace at the top using the same method and allowed that to dry. Arrange your clusters and take photos so that you know where to put them when you're ready.


Next I used Wendy Vecchi embossing paste in black through a Martha Stewart silk screen to attain the large black shape (Above) and the smaller one coming out of the bottom of my cluster. I then adhered the flowers with fabric glue in my hot glue gun and I sewed the small blue Prima baubles  on by hand in the bottom cluster, top cluster and across the lace.


For the back side, I gave a good coating of water and then added more Dylusions in Calypso Teal and Dirty Martini. 


I first added all the lace piece using the gloss gel medium and let them dry. You can add dimension with your lace as I have and the gel medium will allow it to dry stiff and hold it's shape. Next I used the Hollyhocks stamp with Stazon jet black ink


and added a script stamp in Stazon Timber Brown. Notice that I even stamped on the lace. It's subtle but a nice touch.


I used a leftover scrap of cheese cloth to make a rosette with a slight tail, added an altered flower that was leftover on my desk, a random button that was sitting there, and finally added the Prima border. Again I used gloss gel to adhere the Prima border so that it was sure to stay.


I definitely think I've redeemed my prior shame of altering a bag. I quite like this one.


And for the giveaway...


The random winner is Geri!!!!  Please email me your address at tiggertoo57@gmail.com.

Thanks so much

{{hugs}}
Andiepants


Saturday, February 8, 2014

eP Get Altered Challenge and 7Dots January Challenge

Get ready to be shocked...I love 7Dots! 

*GASP*

I know right? Anyway...I purchased Messy Head through the Swirly boutique a while back on an impulse. I'm not a big pastels scrapper but I figured...eh! why not.

Of course...I fell in love. What is with this paper company?! For realz! The brick wall patterns and splatters are  instant faux texture on your page. Anything you layer on top just makes it that much more fabulous. 

7Dots has a monthly challenge over at their blog. This month was geometric shapes. Instantly my tiny circles template came to mind. I had to use it!!!


This is a photo that my GF Kim took while she was here scrapping for the weekend. I was coloring flowers and didn't have any protective gloves.

 I decided I wanted to do something monochromatic so I stuck with pinks and only added black and white to accent the photo since my shirt was black and white.  I used the Kaisercraft gems to accent the pink on my fingers in the photo. The clock is Prima and covered in gesso and the doily is Kaisercraft as well.


This photo illustrates the texture created with the tiny circles stencil. LOVE IT! I used Wendy Vecchi paste in white through the stencil. The detail is amazing. The resin piece is from my stash and I did some rarely seen stitching with my sewing machine. I love the look but the time to clean off the sewing table, thread the bobbin, and then the jamming...THE JAMMING!!! Happens whenever I sew on paper. I'm a paper crafter gals...not a seamstress;)


Here you can see the doily stamp that I used randomly all over the page to accentuate the circle motif. I've  had these little metal frames FOR-EV-ER and when I realized I was doing circles....they were perfect. I used the salt and pepper letter stickers from 7DOTS Domestic Goddess for the titles and placed my pop dots under the stickers to lift the letters. 


For the eP get altered challenge we were to alter playing cards. I made this little trinket for my hubby...52 reasons I love you.


The cover is actually cut from cardstock and added in but is not actually a playing card. I used an older line from Echo Park that has been in my stash for the cover and the numbers on the title. The banner is stamp which I fussy cut.

I used basics for this since I was doing an entire deck. Gesso, mist, a little washi tape, and a permanent marker.


Started by covering each card with a layer of gesso. Then I laid out as many cards as I could on my spray mat and sprayed with dylusions mists in calypso teal postbox red.


Because the pattern which I laid out the cards was random the mist for each card was random.


For the last card I had originally set this one aside to make the cover and then realized I would not have 52 reasons!!! By this time I had put away all my mists so I used some of the washi tape that was on other cards and made the last card different


I hope you enjoyed my projects today.

Don't forget to leave a comment on my giveaway post for your chance to win a Time Holtz layering stencil. Winner will be chosen February 14th.

{{hugs}}
Andiepants


Wednesday, February 5, 2014

Valentine's Giveaway and 7DOTS Domestic Goddess

I can't believe it's February already...but you know what that means...

VALENTINE'S DAY!!!

And what would Valentine's Day be without hearts and love and 

BLECH!!!!

However, in the true spirit of valentine's, I decided to create a LO of my darling daughter and use the gorgeous Domestic Goddess line with all the glorious reds and pinks.


I adore how this LO turned out. I'm not much of a red scrapper so I was really surprised at what ended up on the page. 

 Here is a closeup of my fussy cut pieces. I used the Raspberry pudding paper from the Domestic Goddess line and fussy cut some of the lace shapes. The clock is piece of Prima packaging and the bling is a piece of Prima cut into various sections.

For the cluster up in the corner I used a Tim Holtz layering stencil and a Kaisercraft script stamp over it. Layering the inking is one of my favorite techniques. The Chipboard piece is Dusty Attic and is covered with Art Anthology Dimensional velvet. This stuff is FANTASTIC!!! Kim carries all sorts of colors in the eP store! Just click on the link on the right side of my blog under "supplying your obsession".

For the large heart piece of DA chipboard I used the dimensional velvet again and then sprayed with Lindy's in Poinsetta red gold. I made it darker on the corner to more splattered here on the edge and then went over the bottom edge with distress ink. I love faded effects.


The flowers are Petaloo and were originally pink but I went over them with Silks glazes in Va Va Voom red to make this dark rich color. So much fun to customize my embellies.

And now I have a special Valentine treat for you. I have a Tim Holtz layering mask to give away to one lucky person.


All you have to do:
1. Become a follower of this blog (if you aren't already)
2. Like eP on Facebook or Pinterest
3. Leave a comment on my blog here

I will choose a winner via random generator on February 14th!

Good luck!

Sunday, January 12, 2014

Mixed Media Layout with Ninth Wave

Can I just start by saying how much I adore the 9th Wave collection from 7Dots Studios?!  The colors are wonderful and the textures in the background allow for multi dimensional layouts with less bulk to your page. Something any 'chunky' scrapper, like myself, lives for.


The bird bath resin piece is from Prima. I've never cared for it personally but was determined to use it and I just adore the way it turned out. The brick texture stamps along the edge are by BoBunny and the ticket stamp is Prima. I honestly don't know the name of the company where I got my arch window stamp but I LOVE them. 

Thanks for stopping by and make sure you hop over to eP to participate in this months get altered challenge - hearts and tune in Thursday the 16th for the eteam picks challenge for your chance to win.

hugs
Andiepants

Monday, January 6, 2014

Blue Fern and 7DOTS Giveaways

2014 has come in like a lion. Negative 20 degrees and 4 ft of snow...this is the worst winter we have had in decades. However, it brings snowdays, the smell of rustic soups simmering on the stove, creamy hot chocolate in our bellies, and board games in the middle of the day while the wind whips and whistles it's way around the house. 

As for my scrappy world...here is a layout of my absolutely stunning friend Kim.


I used 7DOTS 9th wave papers and stamps from Bo Bunny, Prima, and Tattered Angels. The chippy piece is Blue Fern and the die cut is Spellbinders. There was quite a bit of layering added to this page but I just ADoRE the 7DOTS papers by Finn because there is so much texture already in the background. The ink splatters are inspired by Adrienne Ford. She is a wonderful artist and designer for Prima.


With 2014 the scrappy world has exploded in the anticipation of Winter CHA. Make sure you check out the release of 3 new collections by 7DOTS studios. They have something for everyone and their collections are amazing. 

Here is my favorite


Once released you will be able to find some of these collections in the Eclectic Paperie store! 

To access the eP store just click the link on the right of my blog under "Shopping-enabling your obsession"

Blue Fern studios has also decided to try their hand at paper! Click on the link to access their site and leave your blog link for a chance to win these beautiful papers. I just adore these gorgeous soft colors and the large images perfect for fussy cutting and layering. Reminds of me Webster's pages. Here's just a sample of one of my favorite pieces.


Here's to a wonderful 2014. Hope you were inspired and head on over to 7DOTS and Blue Fern to enter in their giveaways.

{{hugs}}
Andiepants